iOS MachineLearning 系列(3)—— 静态图像分析之区域识别
本系列的前一篇文章介绍了如何使用iOS中自带的API对图片中的矩形区域进行分析。在图像静态分析方面,矩形区域分析是非常基础的部分。API还提供了更多面向应用的分析能力,如文本区域分析,条形码二维码的分析,人脸区域分析,人体分析等。本篇文章主要介绍这些分析API的应用。关于矩形识别的基础文章,链接如下:
https://my.oschina.net/u/2340880/blog/8671152
1 - 文本区域分析
文本区域分析相比矩形区域分析更加上层,其API接口也更加简单。分析请求的创建示例如下:
1
2
3
4
5
6
7
8
9
10
| private lazy var textDetectionRequest: VNDetectTextRectanglesRequest = {
let textDetectRequest = VNDetectTextRectanglesRequest { request, error in
DispatchQueue.main.async {
self.drawTask(request: request as! VNDetectTextRectanglesRequest)
}
}
textDetectRequest.reportCharacterBoxes = true
return textDetectRequest
}()
|
其请求的发起方式,回调结果的处理与矩形分析一文中介绍的一致,这里就不再赘述。唯一不同的是,其分析的结果中新增了characterBoxes属性,用来获取每个字符的所在区域。
文本区域识别效果如下图所示:

2 - 条形码二维码识别
条形码和二维码在生活中非常常见,Vision框架中提供的API不仅支持条码区域的检测,还可以直接将条码的内容识别出来。
条码分析请求使用VNDetectBarcodesRequest类创建,如下:
1
2
3
4
5
6
7
8
| open class VNDetectBarcodesRequest : VNImageBasedRequest {
open class var supportedSymbologies: [VNBarcodeSymbology] { get }
open var symbologies: [VNBarcodeSymbology]
open var results: [VNBarcodeObservation]? { get }
}
|
如果我们不对symbologies属性进行设置,则默认会尝试识别所有支持的类型。示例代码如下:
1
2
3
4
5
6
7
8
9
10
| private lazy var barCodeDetectionRequest: VNDetectBarcodesRequest = {
let barCodeDetectRequest = VNDetectBarcodesRequest {[weak self] request, error in
guard let self else {return}
DispatchQueue.main.async {
self.drawTask(request: request as! VNDetectBarcodesRequest)
}
}
barCodeDetectRequest.revision = VNDetectBarcodesRequestRevision1
return barCodeDetectRequest
}()
|
需要注意,实测需要将分析所使用的算法版本revision设置为VNDetectBarcodesRequestRevision1。默认使用的版本可能无法分析出结果。
条码分析的结果类VNBarcodeObservation中会封装条码的相关数据,如下:
1
2
3
4
5
6
7
8
| open class VNBarcodeObservation : VNRectangleObservation {
open var symbology: VNBarcodeSymbology { get }
open var barcodeDescriptor: CIBarcodeDescriptor? { get }
open var payloadStringValue: String? { get }
}
|
VNBarcodeObservation类也是继承自VNRectangleObservation类的,因此其也可以分析出条码所在的区域,需要注意,对于条形码来说其只能分析出条码的位置,对于二维码来说,其可以准确的识别出二维码的区域,如下图所示:
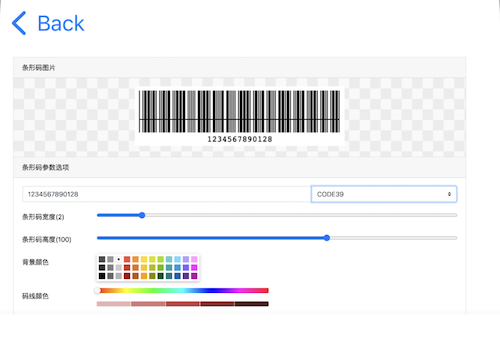

注:互联网上有很多可以生成条码的工具,例如:
https://www.idcd.com/tool/barcode/encode
3 - 轮廓检测
相比前面两种图像分析能力,轮廓检测的能力要更加复杂也更加强大一些。其可以通过图片的对比度差异来对内容轮廓进行分析。轮廓分析使用VNDetectContoursRequest类来创建请求。此类主要功能列举如下:
1
2
3
4
5
6
7
8
9
10
11
12
| open class VNDetectContoursRequest : VNImageBasedRequest {
open var contrastAdjustment: Float
open var contrastPivot: NSNumber?
open var detectsDarkOnLight: Bool
open var maximumImageDimension: Int
open var results: [VNContoursObservation]? { get }
}
|
其检测结果VNContoursObservation类中封装了轮廓的路径信息,在进行轮廓检测时,最外层的轮廓可能有很多内层轮廓组成,这些信息也封装在此类中。如下:
1
2
3
4
5
6
7
8
9
10
11
12
13
14
| open class VNContoursObservation : VNObservation {
open var contourCount: Int { get }
open func contour(at contourIndex: Int) throws -> VNContour
open var topLevelContourCount: Int { get }
open var topLevelContours: [VNContour] { get }
open func contour(at indexPath: IndexPath) throws -> VNContour
open var normalizedPath: CGPath { get }
}
|
需要注意,其返回的CGPath路径依然是以单位矩形为参照的,我们要将其绘制出来,需要对其进行转换,转换其实非常简单,现对其进行方法,并进行x轴方向的镜像反转,之后向下进行平移一个标准单位即可。示例如下:
1
2
3
4
5
6
7
8
9
10
11
12
13
14
15
16
17
18
19
| private func drawTask(request: VNDetectContoursRequest) {
boxViews.forEach { v in
v.removeFromSuperview()
}
for result in request.results ?? [] {
let oriPath = result.normalizedPath
var transform = CGAffineTransform.identity.scaledBy(x: imageView.frame.width, y: -imageView.frame.height).translatedBy(x: 0, y: -1)
let layer = CAShapeLayer()
let path = oriPath.copy(using: &transform)
layer.bounds = self.imageView.bounds
layer.anchorPoint = CGPoint(x: 0, y: 0)
imageView.layer.addSublayer(layer)
layer.path = path
layer.strokeColor = UIColor.blue.cgColor
layer.backgroundColor = UIColor.white.cgColor
layer.fillColor = UIColor.gray.cgColor
layer.lineWidth = 1
}
}
|
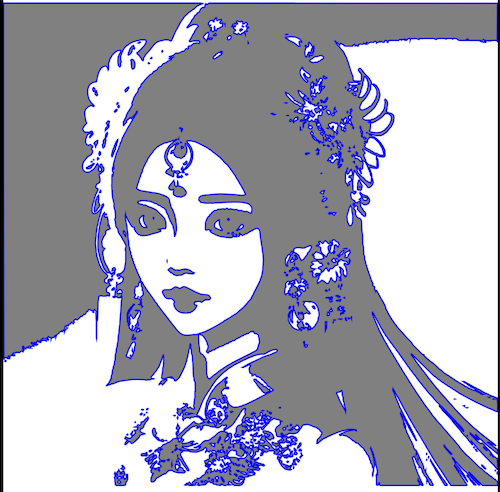
原图与绘制的轮廓图如下所示:
原图:

轮廓:
可以通过VNContoursObservation对象来获取其内的所有轮廓对象,VNContour定义如下:
1
2
3
4
5
6
7
8
9
10
11
12
13
14
15
16
17
18
| open class VNContour : NSObject, NSCopying, VNRequestRevisionProviding {
open var indexPath: IndexPath { get }
open var childContourCount: Int { get }
open var childContours: [VNContour] { get }
open func childContour(at childContourIndex: Int) throws -> VNContour
open var pointCount: Int { get }
open var normalizedPath: CGPath { get }
open var aspectRatio: Float { get }
open func polygonApproximation(epsilon: Float) throws -> VNContour
}
|
理论上说,我们对所有的子轮廓进行绘制,也能得到一样的路径图像,例如:
1
2
3
4
5
6
7
8
9
10
11
12
13
14
15
16
17
18
19
20
21
| private func drawTask(request: VNDetectContoursRequest) {
boxViews.forEach { v in
v.removeFromSuperview()
}
for result in request.results ?? [] {
for i in 0 ..< result.contourCount {
let contour = try! result.contour(at: i)
var transform = CGAffineTransform.identity.scaledBy(x: imageView.frame.width, y: -imageView.frame.height).translatedBy(x: 0, y: -1)
let layer = CAShapeLayer()
let path = contour.normalizedPath.copy(using: &transform)
layer.bounds = self.imageView.bounds
layer.anchorPoint = CGPoint(x: 0, y: 0)
imageView.layer.addSublayer(layer)
layer.path = path
layer.strokeColor = UIColor.blue.cgColor
layer.backgroundColor = UIColor.clear.cgColor
layer.fillColor = UIColor.clear.cgColor
layer.lineWidth = 1
}
}
}
|
效果如下图:

4 - 文档区域识别
文档识别可以分析出图片中的文本段落,使用VNDetectDocumentSegmentationRequest来创建分析请求,VNDetectDocumentSegmentationRequest没有额外特殊的属性,其分析结果为一组VNRectangleObservation对象,可以获取到文档所在的矩形区域。这里不再过多解说。
5 - 人脸区域识别
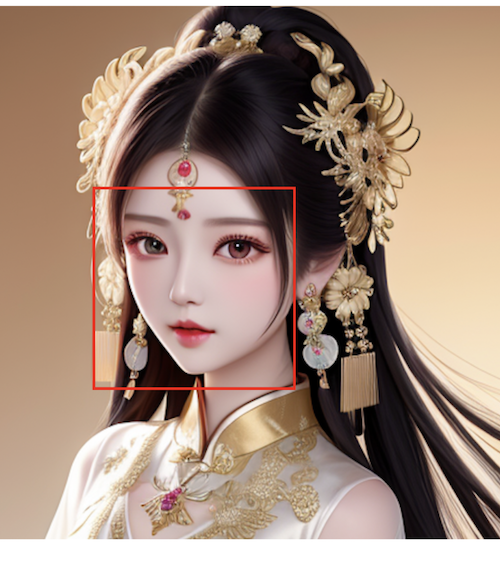
人脸识别在生活中也有着很广泛的应用,在进行人脸对比识别等高级处理前,我们通常需要将人脸的区域先提取出来,Vision框架中也提供了人脸区域识别的接口,使用VNDetectFaceRectanglesRequest类来创建请求即可。VNDetectFaceRectanglesRequest类本身比较加单,继承自VNImageBasedRequest类,无需进行额外的配置即可使用,其分析的结果为一组VNFaceObservation对象,分析效果如下图所示:
VNFaceObservation类本身是继承自VNDetectedObjectObservation类的,因此我们可以直接获取到人脸的区域。VNFaceObservation中还有许多其他有用的信息:
1
2
3
4
5
6
7
8
9
10
| open class VNFaceObservation : VNDetectedObjectObservation {
open var landmarks: VNFaceLandmarks2D? { get }
open var roll: NSNumber? { get }
open var yaw: NSNumber? { get }
open var pitch: NSNumber? { get }
}
|
通过roll,yaw和pitch这3个属性,我们可以获取到人脸在空间中的角度相关信息。landmarks属性则比较复杂,其封装了人脸的特征点。并且VNDetectFaceRectanglesRequest请求是不会分析面部特征的,此属性会为nil,关于面部特征,我们后续介绍。
人脸特征分析请求使用VNDetectFaceLandmarksRequest创建,其返回的结果中会有landmarks数据,示例代码如下:
1
2
3
4
5
6
7
8
9
10
11
12
13
14
15
16
17
18
19
20
21
22
23
24
25
26
27
28
29
30
31
32
33
34
35
36
37
38
39
40
41
42
| private func drawTask(request: VNDetectFaceLandmarksRequest) {
boxViews.forEach { v in
v.removeFromSuperview()
}
for result in request.results ?? [] {
var box = result.boundingBox
box.origin.y = 1 - box.origin.y - box.size.height
let v = UIView()
v.backgroundColor = .clear
v.layer.borderColor = UIColor.red.cgColor
v.layer.borderWidth = 2
imageView.addSubview(v)
let size = imageView.frame.size
v.frame = CGRect(x: box.origin.x * size.width, y: box.origin.y * size.height, width: box.size.width * size.width, height: box.size.height * size.height)
let landmarks = result.landmarks
let allPoints = landmarks?.allPoints?.normalizedPoints
let faceRect = result.boundingBox
for point in allPoints ?? [] {
let rectWidth = imageView.frame.width * faceRect.width
let rectHeight = imageView.frame.height * faceRect.height
let tempPoint = CGPoint(x: point.x * rectWidth + faceRect.minX * imageView.frame.width, y: imageView.frame.height - (point.y * rectHeight + faceRect.minY * imageView.frame.height))
let subV = UIView()
subV.backgroundColor = .red
subV.frame = CGRect(x: tempPoint.x - 2, y: tempPoint.y - 2, width: 4, height: 4)
imageView.addSubview(subV)
}
}
}
|
VNFaceLandmarks2D中封装了很多特征信息,上面的示例代码会将所有的特征点进行绘制,我们也可以根据需要取部分特征点:
1
2
3
4
5
6
7
8
9
10
11
12
13
14
15
16
17
18
19
20
21
22
23
24
25
26
27
28
| open class VNFaceLandmarks2D : VNFaceLandmarks {
open var allPoints: VNFaceLandmarkRegion2D? { get }
open var faceContour: VNFaceLandmarkRegion2D? { get }
open var leftEye: VNFaceLandmarkRegion2D? { get }
open var rightEye: VNFaceLandmarkRegion2D? { get }
open var leftEyebrow: VNFaceLandmarkRegion2D? { get }
open var rightEyebrow: VNFaceLandmarkRegion2D? { get }
open var nose: VNFaceLandmarkRegion2D? { get }
open var noseCrest: VNFaceLandmarkRegion2D? { get }
open var medianLine: VNFaceLandmarkRegion2D? { get }
open var outerLips: VNFaceLandmarkRegion2D? { get }
open var innerLips: VNFaceLandmarkRegion2D? { get }
open var leftPupil: VNFaceLandmarkRegion2D? { get }
open var rightPupil: VNFaceLandmarkRegion2D? { get }
}
|
VNFaceLandmarkRegion2D类中具体封装了特征点位置信息,需要注意,特征点的坐标是相对人脸区域的比例值,要进行转换。
主要提示:特征检测在模拟器上可能不能正常工作,可以使用真机测试。
默认人脸特征分析会返回76个特征点,我们可以通过设置VNDetectFaceLandmarksRequest请求实例的constellation属性来修改使用的检测算法,枚举如下:
1
2
3
4
5
6
7
| public enum VNRequestFaceLandmarksConstellation : UInt, @unchecked Sendable {
case constellationNotDefined = 0
case constellation65Points = 1
case constellation76Points = 2
}
|
效果如下图:

Vision框架的静态区域分析中与人脸分析相关的还有一种,使用VNDetectFaceCaptureQualityRequest请求可以分析当前捕获到的人脸的质量,使用此请求分析的结果中会包含如下属性:
1
2
3
4
| extension VNFaceObservation {
@nonobjc public var faceCaptureQuality: Float? { get }
}
|
faceCaptureQualit值越接近1,捕获的人脸效果越好。
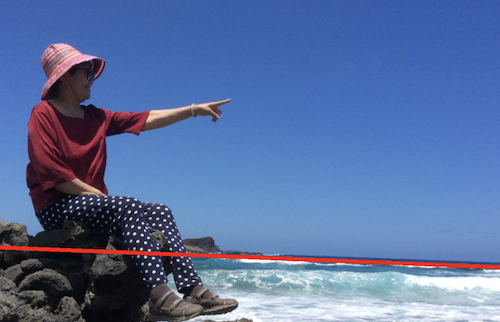
6 - 水平线识别
VNDetectHorizonReques用来创建水平线分析请求,其可以分析出图片中的水平线位置。此请求本身比较简单,其返回的结果对象为VNHorizonObservation,如下:
1
2
3
4
| open class VNHorizonObservation : VNObservation {
open var angle: CGFloat { get }
}
|
分析结果如下图所示:
7 - 人体相关识别
人体姿势识别也是Vision框架非常强大的一个功能,其可以将静态图像中人体的关键节点分析出来,通过这些关键节点,我们可以对人体当前的姿势进行推断。在运动矫正,健康检查等应用中应用广泛。人体姿势识别请求使用VNDetectHumanBodyPoseRequest类创建,如下:
1
2
3
4
5
6
7
8
| open class VNDetectHumanBodyPoseRequest : VNImageBasedRequest {
open class func supportedJointNames(forRevision revision: Int) throws -> [VNHumanBodyPoseObservation.JointName]
// 获取所支持检查的关键节组
open class func supportedJointsGroupNames(forRevision revision: Int) throws -> [VNHumanBodyPoseObservation.JointsGroupName]
// 分析结果
open var results: [VNHumanBodyPoseObservation]? { get }
}
|
VNHumanBodyPoseObservatio分析结果类中封装的有各个关键节点的坐标信息,如下:
1
2
3
4
5
6
7
8
9
10
| open class VNHumanBodyPoseObservation : VNRecognizedPointsObservation {
open var availableJointNames: [VNHumanBodyPoseObservation.JointName] { get }
open var availableJointsGroupNames: [VNHumanBodyPoseObservation.JointsGroupName] { get }
open func recognizedPoint(_ jointName: VNHumanBodyPoseObservation.JointName) throws -> VNRecognizedPoint
open func recognizedPoints(_ jointsGroupName: VNHumanBodyPoseObservation.JointsGroupName) throws -> [VNHumanBodyPoseObservation.JointName : VNRecognizedPoint]
}
|
下面示例代码演示了如何对身体姿势节点进行解析:
1
2
3
4
5
6
7
8
9
10
11
12
13
14
| private func drawTask(request: VNDetectHumanBodyPoseRequest) {
boxViews.forEach { v in
v.removeFromSuperview()
}
for result in request.results ?? [] {
for point in result.availableJointNames {
if let p = try? result.recognizedPoint(point) {
let v = UIView(frame: CGRect(x: p.x * imageView.bounds.width - 2, y: (1 - p.y) * imageView.bounds.height - 2.0, width: 4, height: 4))
imageView.addSubview(v)
v.backgroundColor = .red
}
}
}
}
|
效果如下图:

所有支持的身体节点名和节点组名列举如下:
1
2
3
4
5
6
7
8
9
10
11
12
13
14
15
16
17
18
19
20
21
22
23
24
25
26
27
28
29
30
31
32
33
34
35
36
37
38
39
40
41
42
43
44
45
46
47
48
49
50
51
52
53
54
55
56
57
58
|
extension VNHumanBodyPoseObservation.JointName {
public static let nose: VNHumanBodyPoseObservation.JointName
public static let leftEye: VNHumanBodyPoseObservation.JointName
public static let rightEye: VNHumanBodyPoseObservation.JointName
public static let leftEar: VNHumanBodyPoseObservation.JointName
public static let rightEar: VNHumanBodyPoseObservation.JointName
public static let leftShoulder: VNHumanBodyPoseObservation.JointName
public static let rightShoulder: VNHumanBodyPoseObservation.JointName
public static let neck: VNHumanBodyPoseObservation.JointName
public static let leftElbow: VNHumanBodyPoseObservation.JointName
public static let rightElbow: VNHumanBodyPoseObservation.JointName
public static let leftWrist: VNHumanBodyPoseObservation.JointName
public static let rightWrist: VNHumanBodyPoseObservation.JointName
public static let leftHip: VNHumanBodyPoseObservation.JointName
public static let rightHip: VNHumanBodyPoseObservation.JointName
public static let root: VNHumanBodyPoseObservation.JointName
public static let leftKnee: VNHumanBodyPoseObservation.JointName
public static let rightKnee: VNHumanBodyPoseObservation.JointName
public static let leftAnkle: VNHumanBodyPoseObservation.JointName
public static let rightAnkle: VNHumanBodyPoseObservation.JointName
}
extension VNHumanBodyPoseObservation.JointsGroupName {
public static let face: VNHumanBodyPoseObservation.JointsGroupName
public static let torso: VNHumanBodyPoseObservation.JointsGroupName
public static let leftArm: VNHumanBodyPoseObservation.JointsGroupName
public static let rightArm: VNHumanBodyPoseObservation.JointsGroupName
public static let leftLeg: VNHumanBodyPoseObservation.JointsGroupName
public static let rightLeg: VNHumanBodyPoseObservation.JointsGroupName
public static let all: VNHumanBodyPoseObservation.JointsGroupName
}
|
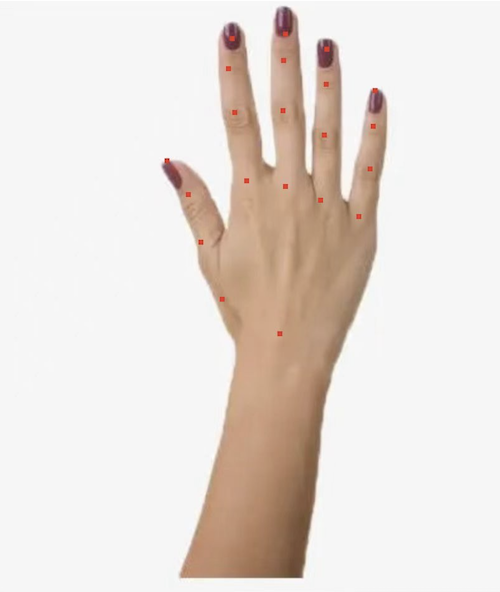
与人体姿势识别类似,VNDetectHumanHandPoseRequest用来对手势进行识别,VNDetectHumanHandPoseRequest定义如下:
1
2
3
4
5
6
7
8
9
10
| open class VNDetectHumanHandPoseRequest : VNImageBasedRequest {
open class func supportedJointNames(forRevision revision: Int) throws -> [VNHumanHandPoseObservation.JointName]
// 支持的手势节点组
open class func supportedJointsGroupNames(forRevision revision: Int) throws -> [VNHumanHandPoseObservation.JointsGroupName]
// 设置最大支持的检测人手数量,默认2,最大6
open var maximumHandCount: Int
// 识别结果
open var results: [VNHumanHandPoseObservation]? { get }
}
|
VNHumanHandPoseObservation类的定义如下:
1
2
3
4
5
6
7
8
9
10
11
| open class VNHumanHandPoseObservation : VNRecognizedPointsObservation {
open var availableJointNames: [VNHumanHandPoseObservation.JointName] { get }
open var availableJointsGroupNames: [VNHumanHandPoseObservation.JointsGroupName] { get }
open func recognizedPoint(_ jointName: VNHumanHandPoseObservation.JointName) throws -> VNRecognizedPoint
open func recognizedPoints(_ jointsGroupName: VNHumanHandPoseObservation.JointsGroupName) throws -> [VNHumanHandPoseObservation.JointName : VNRecognizedPoint]
open var chirality: VNChirality { get }
}
|
chiralit属性用来识别左右手,枚举如下:
1
2
3
4
5
6
7
8
| @frozen public enum VNChirality : Int, @unchecked Sendable {
case unknown = 0
case left = -1
case right = 1
}
|
在手势识别中,可用的节点名列举如下:
1
2
3
4
5
6
7
8
9
10
11
12
13
14
15
16
17
18
19
20
21
22
23
24
25
26
27
28
29
30
31
32
33
34
35
36
37
38
39
40
41
42
43
44
45
46
47
48
| extension VNHumanHandPoseObservation.JointName {
public static let wrist: VNHumanHandPoseObservation.JointName
public static let thumbCMC: VNHumanHandPoseObservation.JointName
public static let thumbMP: VNHumanHandPoseObservation.JointName
public static let thumbIP: VNHumanHandPoseObservation.JointName
public static let thumbTip: VNHumanHandPoseObservation.JointName
public static let indexMCP: VNHumanHandPoseObservation.JointName
public static let indexPIP: VNHumanHandPoseObservation.JointName
public static let indexDIP: VNHumanHandPoseObservation.JointName
public static let indexTip: VNHumanHandPoseObservation.JointName
public static let middleMCP: VNHumanHandPoseObservation.JointName
public static let middlePIP: VNHumanHandPoseObservation.JointName
public static let middleDIP: VNHumanHandPoseObservation.JointName
public static let middleTip: VNHumanHandPoseObservation.JointName
public static let ringMCP: VNHumanHandPoseObservation.JointName
public static let ringPIP: VNHumanHandPoseObservation.JointName
public static let ringDIP: VNHumanHandPoseObservation.JointName
public static let ringTip: VNHumanHandPoseObservation.JointName
public static let littleMCP: VNHumanHandPoseObservation.JointName
public static let littlePIP: VNHumanHandPoseObservation.JointName
public static let littleDIP: VNHumanHandPoseObservation.JointName
public static let littleTip: VNHumanHandPoseObservation.JointName
}
extension VNHumanHandPoseObservation.JointsGroupName {
public static let thumb: VNHumanHandPoseObservation.JointsGroupName
public static let indexFinger: VNHumanHandPoseObservation.JointsGroupName
public static let middleFinger: VNHumanHandPoseObservation.JointsGroupName
public static let ringFinger: VNHumanHandPoseObservation.JointsGroupName
public static let littleFinger: VNHumanHandPoseObservation.JointsGroupName
public static let all: VNHumanHandPoseObservation.JointsGroupName
}
|
效果如下图:
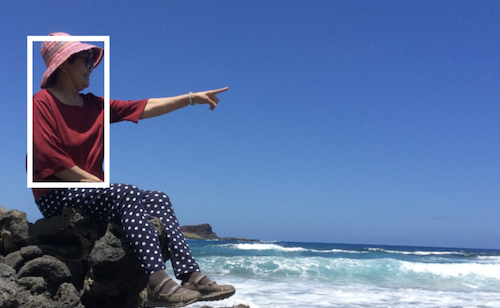
如果我们只需要识别人体的躯干部位,则使用VNDetectHumanRectanglesRequest会非常方便,VNDetectHumanRectanglesRequest定义如下:
1
2
3
4
5
6
| open class VNDetectHumanRectanglesRequest : VNImageBasedRequest {
open var upperBodyOnly: Bool
open var results: [VNHumanObservation]? { get }
}
|
人体躯干识别的结果用法与矩形识别类似,效果如下:
需要注意:人体姿势识别和手势识别的API在模拟器上可能无法正常的工作。
本篇文章,我们介绍了许多关于静态图像区域分析和识别的API,这些接口功能强大,且设计的非常简洁。文本中所涉及到的代码,都可以在如下Demo中找到:
https://github.com/ZYHshao/MachineLearnDemo
专注技术,懂的热爱,愿意分享,做个朋友